
The video of my LondonReact talk on this topic is now available on YouTube.
Isomorphic JS is becoming increasingly popular, and for good reasons. Users gets a better experience: the application or website loads and renders faster, doesn’t stop working completely when JS fails (and it will), and provides an accessible and crawl-able baseline (real DOM markup returned from the server), free for the client to progressively enhance.
So why doesn’t everyone run their apps isomorphically? Well, it is extra work to setup, and there’s the fear that isomorphism will lead to unmanageable levels of complexity in the code. There are also frameworks out there that still just don’t jibe at all with server rendering (looking at you, Angular). Even using something like React that is perfectly suited for Isomorphism, there still a lack of tutorials and documentation for how to achieve an isomorphic setup.
In this post I will walk through the isomorphic React setup we use for the new version of State.com, and the problems we encountered along the way.
React render flow (client side) #
Before we go into the Isomorphic flow, let’s cover a standard React client render flow first:

The render flow is triggered by a new URL, in most cases set by your router via history.pushState. The URL matches a route, which maps to a <Page> component which you then render using React.render. If the <Page> needs some new data, it is requested from the React component’s componentDidMount lifecycle method. Note: We talk about Pages in our application; React and others refer to Views.
Isomorphic React render flow #
When rendering React isomorphically the overall flow is very similar, but the thing that changes is data fetching.

Note that we use an isomorphic router with the same routing table on client and server to avoid code duplication. The server render uses React.renderToString instead of React.render, and it also embeds the React output into a full HTML response.
On the server we cannot request data in componentDidMount as we would on the client, as it is never called by React.renderToString (even if it was; asynchronous data requests wouldn’t be serialisable). So what do we do instead? We fetch the data before rendering React.
Pre render data fetching #
When we started building the next version of State.com using Isomorphic React we initially declared the data requests needed for our <Page>s in our routing table. We found that this bloated the code in the routing table, and that it was confusing having the data logic for our app split into multiple places: some in the routing table, some still in our React components. In the end we went back to declaring these data request inside the components.
How can we declare the data requests inside components, but access this information before we render? The statics component property that React offers allows us to do just that. It’s a property on your components where you can declare methods that can be access outside of React.
Inside requestsForProps on our <Page> components. The method returns request information based on which we can later make requests — we’re not making the requests in this method itself.
  var MyPage = React.createClass({
    statics: {
      requestForProps: function(props) {
  	     return userProvider.all.request();
      };
    }
  });
Note that the userProvider is part of an abstraction layer for our api that allows us to declare those data requests using the same syntax for both server and client.
We can now call MyPage.requestForProps to access those requests before we render. We execute the requests, and then on the server we wait for them all to return before we render React, whereas on the client we render immediately and let React re-render as response data comes back. Note: This gives us a single point in the code which encapsulates all requests we need to make, making it a focal point for combining/optimising those requests. Another note on the requestsForProps name: other people seem to use names such as fetchData for this functionality. We think such a name is misleading for us, given that the method doesn’t fetch the data itself, and that the final decision on what to fetch is made upstream.
Bootstrapping render context #
Now we have an isomorphic render flow allowing us to use the same code to render both on the server and the client, but we’re not done just yet. After we’ve rendered on the server, we need to do a special “boot” render of React on the client in order to hook up event listeners. This “boot” render is different from every other client render in that we should reuse the render context that we used on the server, rather than deriving it in the usual way (via requestForProps etc). We also need to use the same context because if we pass different props to React then React’s virtual DOM will diff, and React will be forced to re-render the DOM (React will give you a checksum warning for this).
What is needed is a mechanism for passing the server render context to the client. We achieve this by just dumping all that info into a JSON inside a script tag when rendering on the server, that we then parse on the client:
  // server
  <script id=‘context’ type=‘application/json’>
    var context = JSON.stringify({
      page: Page.displayName,
      data: data
      ...
    });
  </script>
  // client
  var context = JSON.parse(
    document.getElementById(‘context’).textContent
  );
Note that we cannot put the <Page> component itself in this context JSON, as it is a function and therefor cannot be serialised. We rely on it’s displayName instead — if you do too, make sure it’s unique, and set on all your Page components!
Also note that you might have to do some escaping of the content you put into the context, f.e. of literal < and > characters.
With this context available, you’ll now be able to render on the client with exactly the same props and data as on the server. If you have a very simple data model for your application or website, this might be all you need for your isomorphic setup. If the model is complicated however, or if you cache your data, or it changes over time, then perhaps you should be using Flux — so let’s talk about setting that up isomorphically. Should I use Flux?
Isomorphic Flux #
Note that with Relay on the horizon, the way we use Flux will probably change significantly over the next few months. Below I describe our current implementation of a Flux pattern.
I’m not going to cover Flux in any depth here; if you don’t know anything at all about it you’ll probably be better off if you go and read up on it before continuing here. What’s important to understand is that it is a unidirectional data flow pattern and that <Page> components (Views in the diagram below) get their data from Stores.

Early on we were confused about using Flux isomorphically — how could you run Stores on the server? Should you? We started out trying the opposite, running Flux and Stores only on the client, but in the end we found that it required more code and complexity compared to our isomorphic implementation. In the end, running Stores on the server wasn’t very complicated, there are just a few things you need to be aware of, so let’s go through them now.
Resetting Flux Stores #
Flux Stores are singletons, meaning that you start them when the app starts, and then just let them live on. For the server this has the consequence that you need to take care to not leak user specific data between requests. If user B comes visiting your site after user A, and the server is still running Stores with user A’s data.. the data will leak into user B’s session. To prevent that, we need to be able to reset Stores, which fortunately is quite trivial:
  MyStore = {
     _data: [];

    ...

    reset: function() {
     this._data = [];
    }
  };
On the server we need to call this method on each store after we’re done with our render. We also use this method on the client; for example when a user logs out and then in as a different user.
Synchronous Flux data flow for the server #
Another difference for the server environment is that the whole Flux data flow (from populating Stores with data until we reset them again) needs to be synchronous, because we cannot allow multiple requests to modify the same Stores at the same time. By keeping these execution steps synchronous we prevent subsequent requests from interfering with the currently handled request. On the client we don’t have this kind of requirement.
In practice this means that if you use Actions on the server, they need to be synchronous, if you use a Dispatcher, the same goes for it. I presume you could instead make your server render logic wait for an async Dispatcher to signal that it’s ready before moving on. We never tried this approach.
Bootstrapping Stores #
After we’ve got our data into our stores on the server, we don’t want to have to re-enact the same data flow on the client “boot” render, so now the render context object we talked about before needs to contain bootstrapped Stores instead of raw request data. Bootstrapping Stores is as trivial as resetting them: all that’s needed is functions on each Store to snapshot and restore its data.
Snapshot & Restore #
  MyStore = {
     _data: [];

    snapshot: function() {
     return this._data;
    },

    restore: function(snapshot) {
     this._data = snapshot;
    }

  };
After we’ve synchronously populated our Stores with the data fetched via requestForProps, we can add their snapshots into the context object that we’re passing from server to the client (replacing the raw data we had there before):
  // server
  <script id=‘context’ type=‘application/json’>
    var context = JSON.stringify({
      ...
      snapshots: {
        "UserStore": UserStore.snapshot(),
        ...
      }
    });
  </script>
The client just does the reverse; calls restore on each Store in context.snapshot, with its data. This needs to happen before React.render is called.
If you’ve have managed to follow along what I’ve covered so far you should (hopefully) have a really good understanding of how to set up an Isomorphic render flow with data Stores for React.
How We Populate our Flux Stores #
I’m going to conclude this post with a section on how we populate our Flux Stores. This pattern is not required for Isomorphic React, but it has worked very well for us as an isomorphic data store distribution solution.
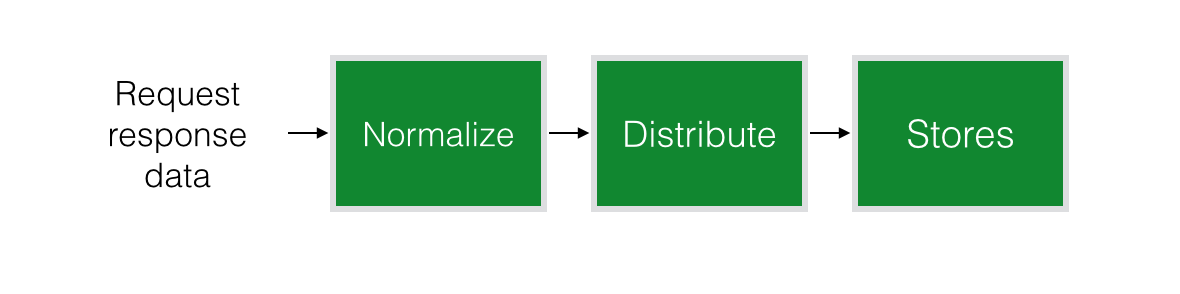
Normalise api response #
The first step we go through is normalising our nested api responses, which makes the data easier to use with Flux Stores. If your api already gives back normalised data, you can skip this step.
Basically what we want to achieve is having one Store per resource type in our api (f.e. User) being responsible for storing that type of data. Any other resource type that appears nested in the objects in a Store will just be held as ID’s. As an example, the UserStore contains full User objects, but Users appearing inside the Statements in the StatementStore will only be kept as id’s.
We use normalizr for our api response normalisation, which splits any JSON data into one object per resource type, populated with all the identified objects of that type found in the response, and with all nested resource objects replaced by their id’s.
Distribute data to stores #
With the data already organised in exactly the way each Store wants it, distributing it is easy. We trigger one Action per resource type in the normalised array, with the corresponding data, and each Store listens to these events for the resource type it’s storing.
Going back to the render flow I have introduced in this post, I hope it’s easy to see why this distribution pattern works well for us. When making the requests given by requestForProps, the data automatically flows into the Stores! All we need to do is to ensure the Stores are running before we make the requests. The exact same pattern is used during runtime on the client.
Summary #
- Fetch data before before rendering React
-
Use
Staticsto co-locate data requests with component logic - Bootstrap server render context
- Snapshot, restore and reset Stores
- Optional: Auto distribute request data to stores
You can run your React application isomorphically, even if you have have complicated data models and use Flux and multiple Stores. It won’t have to lead to extra complexity. All code we write when adding a new Store, Route, API endpoint or Component is isomorphic, and defined once. The extra code that is needed, such as the abstraction layer on top of our api, and the different render sequence, is code that only has to be invested in once, and that isn’t large or complicated either.
I’ve shared this information thinking it should be helpful to people in the same situation as we in my company were in a few months back. If you find anything in the post unclear, or if you just want more information — don’t hesitate to ask me.